Attio is a fast, flexible CRM, but it has no built-in way to turn a record into a finished document. Most teams who need to generate documents from their Attio records end up either:
- Copying and pasting data from Attio into a Google Doc / Microsoft Word template or
- Connecting to a third party document generation tool that wasn't specifically built for Attio
Neither option is ideal. In this guide we will show you how to generate documents from Attio directly from a record, using DocuPotion, a document generation and e-signature tool built specficially for Attio. Once it is set up, you produce a quote, proposal, contract or invoice in a few clicks, and the finished PDF is uploaded straight back to the Attio record it came from. Once your automation is set up, ou never have to leave your Attio workspace.
We will use a quote as the running example, but the same steps work for any document you generate from your Attio data: proposals, NDAs, contracts, invoices and more.
What you can generate from Attio
If a record holds the data, DocuPotion can merge it into a document. The most common documents teams generate from Attio are:
- Quotes and proposals from a deal record, priced from the products attached to it
- Contracts and NDAs, sent for signature without a separate signing tool
- Invoices, with line items that come from related records and total themselves
- Reports and letters built from any standard, custom or related attribute
The whole flow lives on the record, so whoever generates the document does it the same way, and the output always reflects the current data in Attio.
How it works
There are three pieces to generating documents from Attio, and you only set them up once:
- Connect your Attio workspace to DocuPotion.
- Build a template, either from a Google Doc or an existing PDF, with
{{merge_fields}}where your Attio data should go. - Create an automation that maps those merge fields to Attio attributes and decides where the finished document is delivered.
After that, generating a document is a case of opening a record and clicking a button. Let's walk through each step.
Before you start
You will need:
- An Attio workspace where you can install apps (workspace admin).
- A DocuPotion account. You can start a free trial with no credit card required.
- The DocuPotion Attio app installed on your workspace.
You can install the DocuPotion app from the Attio marketplace. It takes a couple of minutes to set up on your workspace.
Step 1: Connect Attio to DocuPotion
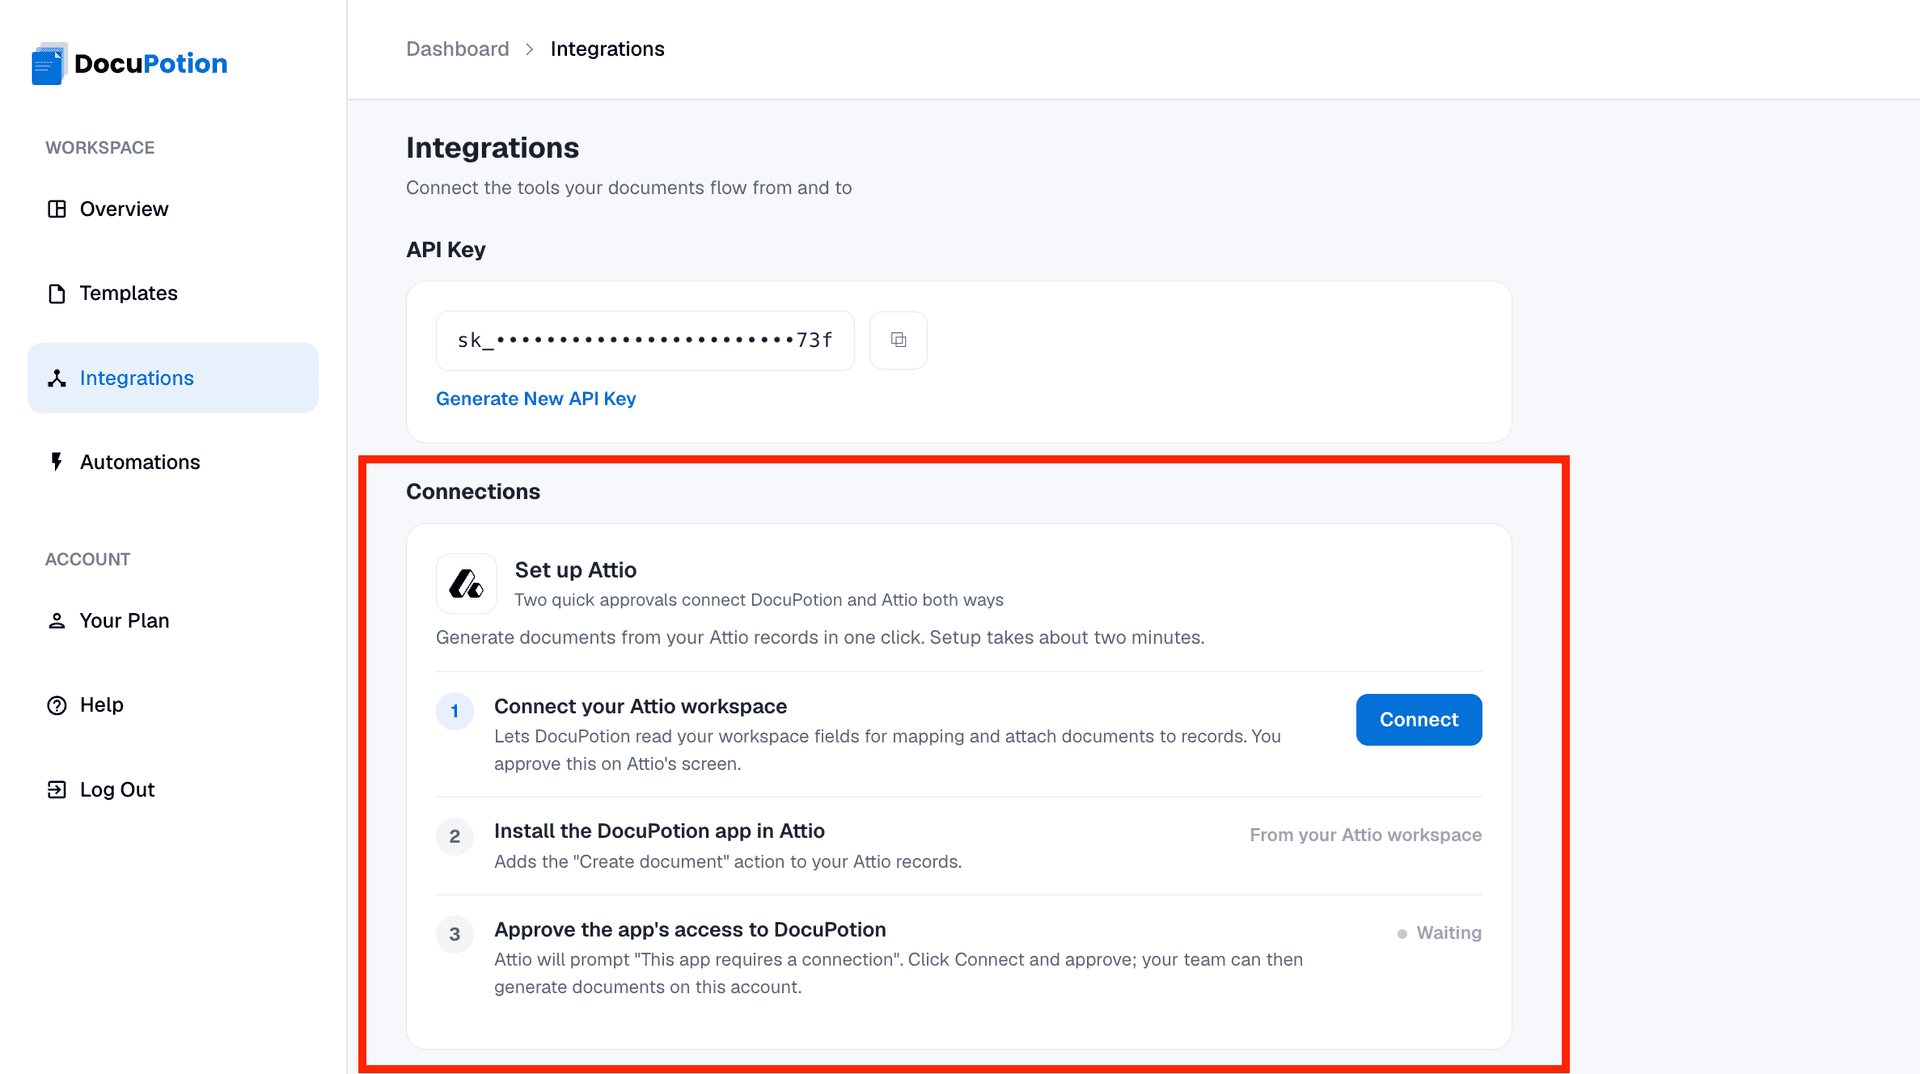
The connection is two-way, so you approve it once on each side. This is what lets DocuPotion read your workspace fields and attach finished documents back to your records.
On the DocuPotion side, open the Integrations page, click Connect on the Attio card, and approve the workspace connection. On the Attio side, open Apps, select DocuPotion, and click + Connect to authorise it. The Integrations checklist shows both steps as complete once you are done.
DocuPotion tip: Full setup details are in the Attio quickstart guide. It covers the two approval steps and the optional Documents widget you can add to a record layout.
Step 2: Create your template
A template is the reusable design that gets populated with your Attio data. Head to the Templates tab in DocuPotion, click New Template, and pick the approach that suits your document:
- Start from a Google Doc. Connect Google Drive and use a Google Doc that contains merge tags such as
{{company_name}}. This is the most flexible option for layouts with tables or reflowing text. See Creating a template from a Google Doc. - Upload an existing PDF. Turn a PDF you already use into a template by placing fields on top of it. This is the right choice when the layout has to stay exactly as it is, such as an official form or a contract with fixed wording. See Creating a template from an existing PDF.
In a Google Doc template, you write merge tags inline wherever a value should appear:
Quote for {{company_name}}
Prepared by {{owner_name}} on {{quote_date}}
For a table of line items, wrap the repeating row in a loop so it repeats once per related record:
{{#line_items}}
{{item_name}}   {{quantity}}   {{unit_price}}   {{amount}}
{{/line_items}}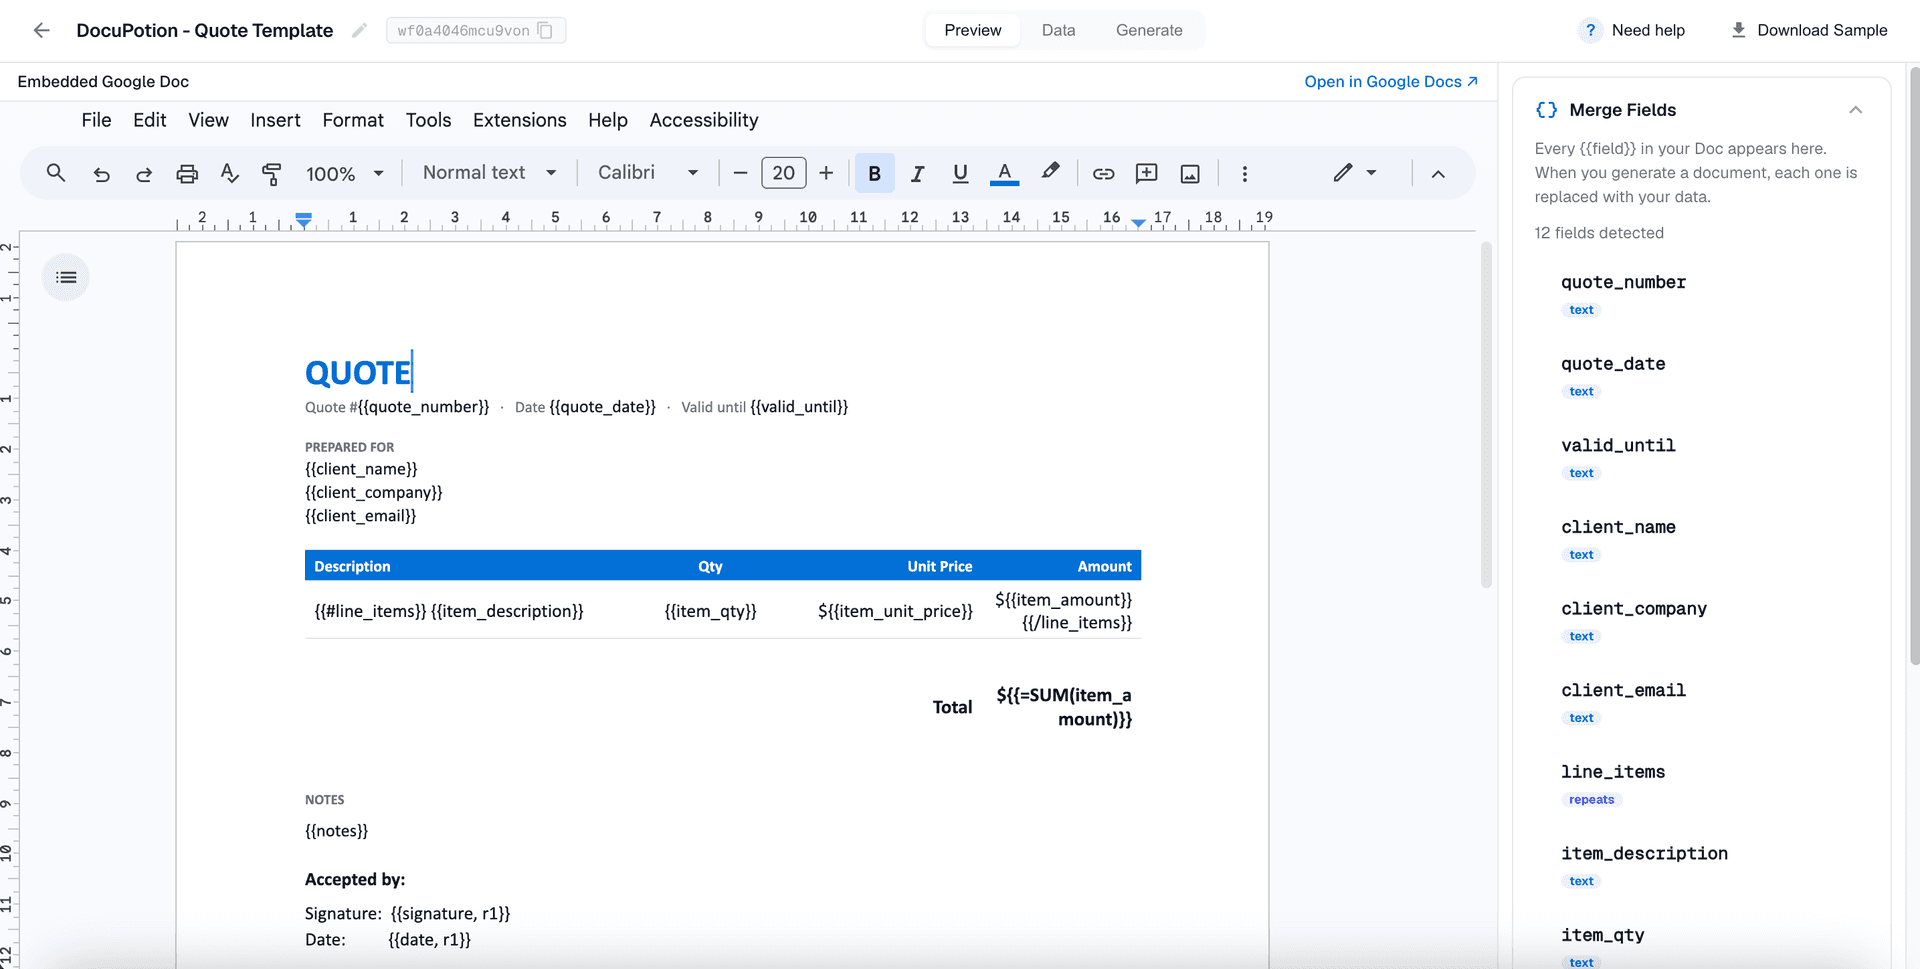
Step 3: Build an automation
The automation is where you tell DocuPotion which records to use and how to fill the template. Open the Automations tab, click + New automation, and work through it:
- Select your template and give the automation a name.
- Choose the Attio object you will generate from: deals, companies, people or a custom object.
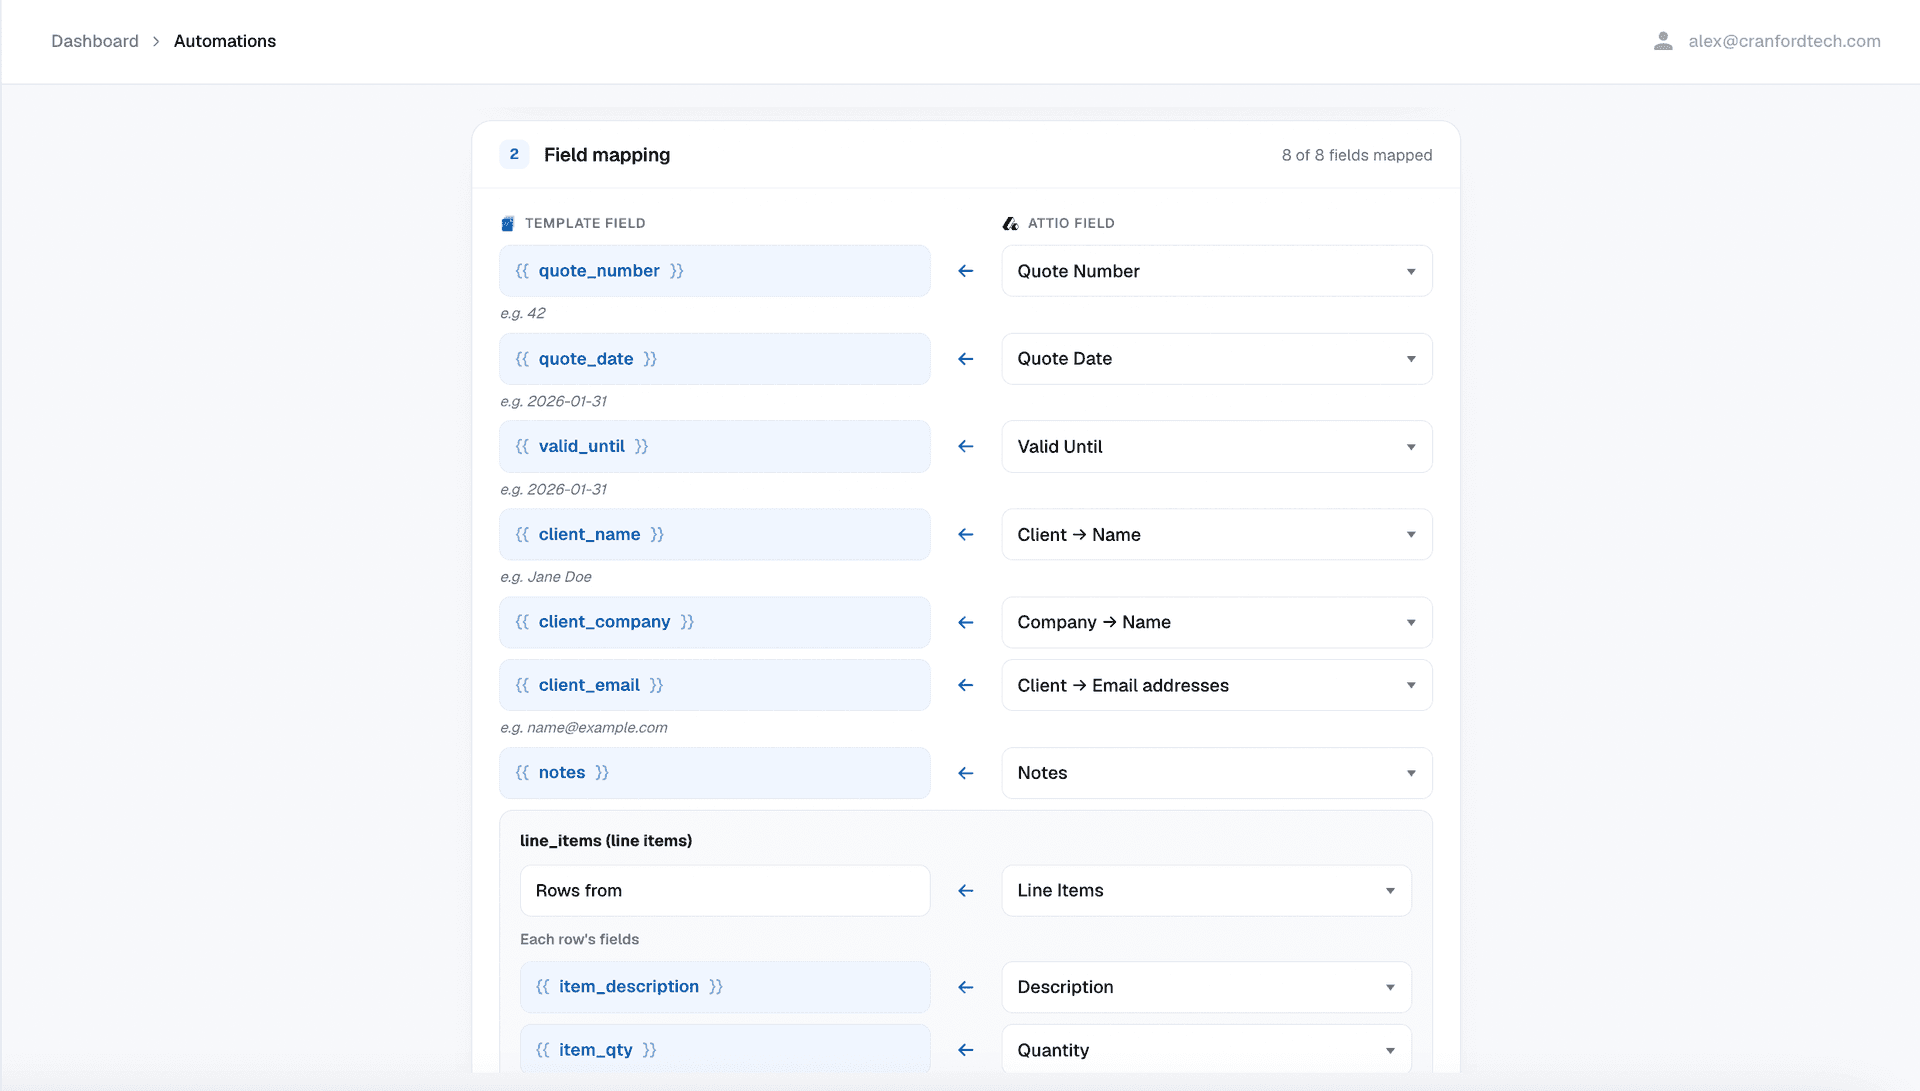
- Map each merge field to an Attio attribute. You can map standard attributes, custom attributes, and reach one hop into related records, which is how a deal's associated company or its products flow into the document.
- Choose your delivery. The finished PDF attaches to the record's files automatically. You can also save a copy to Google Drive, email it, or send it for e-signature.
Pulling in line items from related records
Quotes and invoices usually need a table of line items, and this is where a CRM-native tool earns its place. Because you mapped the loop to a related list, each related record, a product or a deal item, becomes a row in the table. Quantities and unit prices come straight from the records, and a SUM formula adds up the total at generation time, so the maths never depends on whoever edited the document last. Change the records in Attio and the next document follows. There is more on this on the line items page.
Step 4: Generate a document from a record
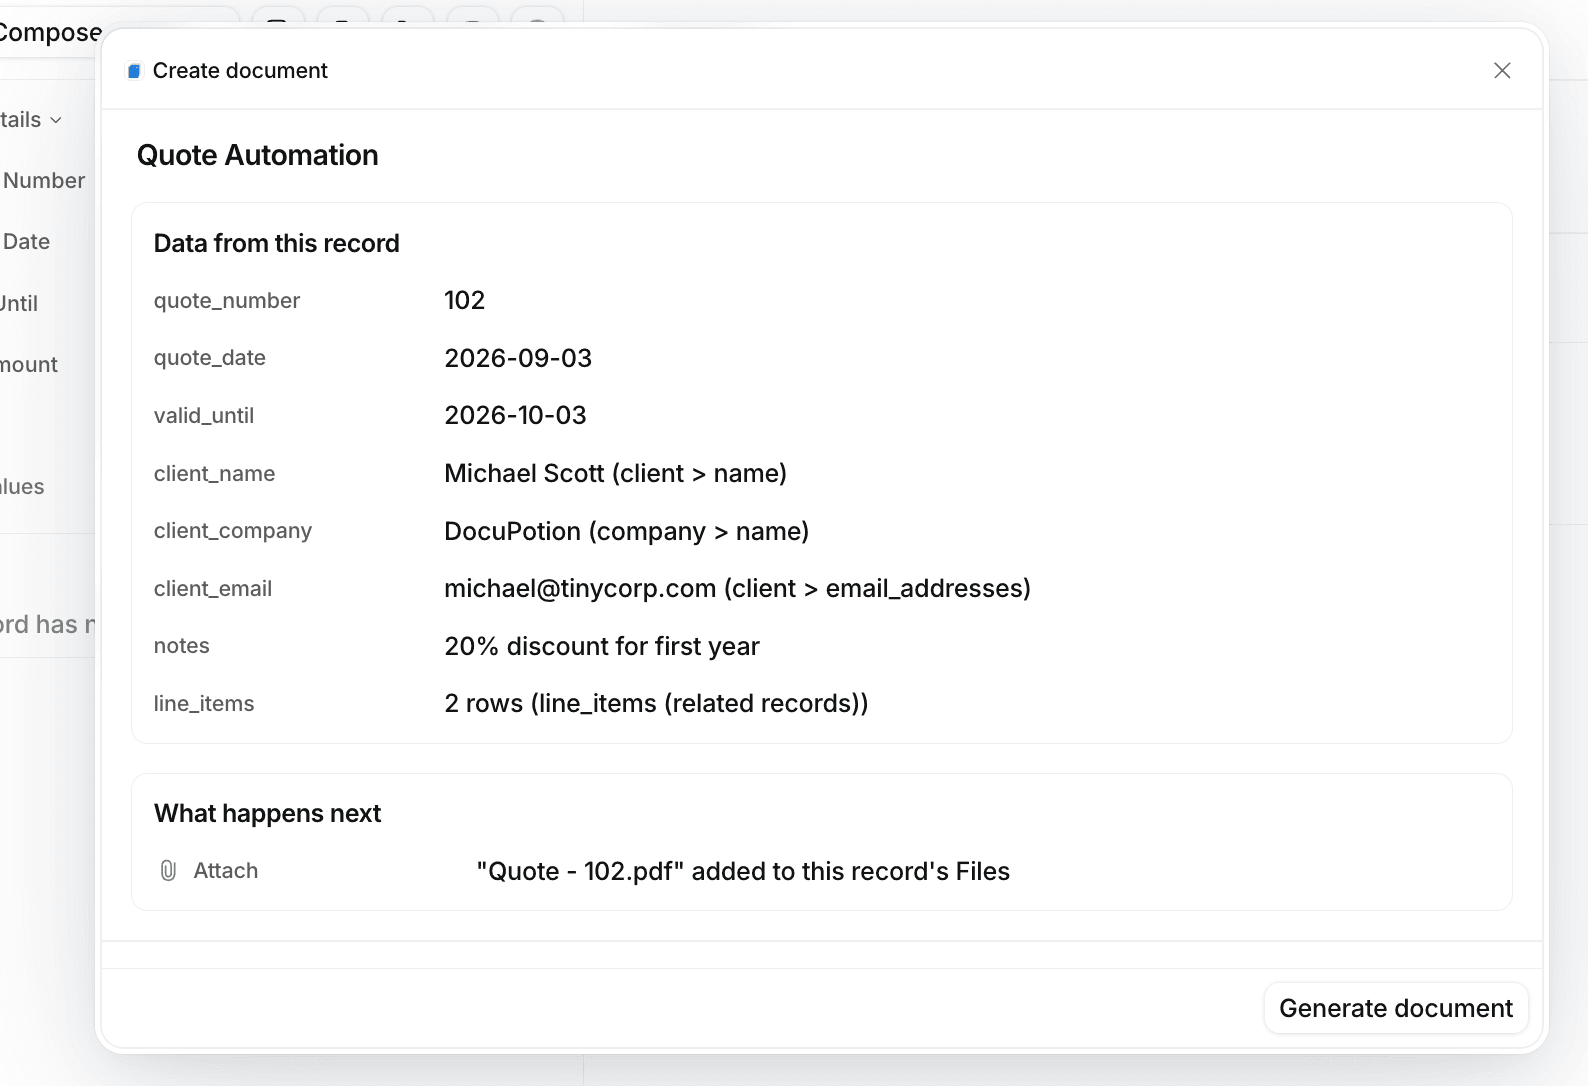
With the automation saved, generating is quick. Open any record of that object in Attio and click Create document. DocuPotion shows you a preview of the data it is about to merge so you can check it, then you click generate. A few seconds later, a professional PDF is attached to the record's files.
DocuPotion tip: Add the DocuPotion Documents widget to your record layout. It shows how many documents a record has and their e-signature status, so your team can see everything at a glance without leaving the record.
Collecting e-signatures from Attio records
If your document needs signing, you can send it for e-signature from the same flow, so there is no separate signing tool to log into.
Add signature fields to your template first. In a Google Doc, that is a tag per signer, for example {{signature, r1}} for the first signer and {{signature, r2}} for the second. You can also add {{date, r1}}, initials and text fields. Every signer needs at least one signature field.
Then switch on Send for signature in the automation's delivery section and set where each signer's email comes from: an Attio field, a fixed address, or whoever runs it. When you generate from a record, each signer receives their own signing request by email, and you can track progress in the Documents widget, which shows a live status such as "1 of 2 signed". When everyone has signed, the sealed copy is attached to the Attio record automatically and emailed to every party.
The full walkthrough is in Collect e-signatures from Attio records, and there is more on how it works on the e-signatures page.
Signatures collected through DocuPotion comply with the ESIGN Act and UETA in the US, and qualify as electronic signatures under eIDAS in the EU. Once everyone has signed, the document is sealed against tampering.
Choosing where your documents go
Every document is filed to the Attio record it was generated from, so it is always where your team would look for it. On top of that, you can choose to:
- Save a copy to a Google Drive folder you pick.
- Email the finished document straight to the client or your team.
You set these once in the automation and DocuPotion runs them every time. There is more on filing and delivery on the document management page.
Wrapping up
That is all it takes to generate documents from Attio. You connect your workspace once, build a reusable template from a Google Doc or a PDF, map its fields to your Attio attributes in an automation, and from then on your team produces quotes, invoices and contracts in a few clicks, straight from the record, with e-signatures and delivery handled for you.
Ready to try it? Install the DocuPotion app from the Attio marketplace and generate your first document today.